
Microsoft’s Office 365 service is an online service more like Google G Suite than the Microsoft Office software that you have traditionally installed onto your PC.
There are different levels of service, but they are all paid-for. Some are aimed at home users, others at business users. Some offer just email service, others online versions of Word, Excel etc, and others include both of those as well as licences for the traditional software that you can install on your PC.
Administering Office365
Some of Office365’s administrative options are accessible via the web using the “Office365 Portal” but others are available only via a command line interface.
Installing the Powershell system required to administer Office365
To be able to use the command line interface, you must install two applications to your PC. Before you install either of them, you need to know if you are using a 32-bit or a 64-bit version of Windows. (If you’re not sure, the rest of these notes are probably not for you – ask for help)
- Microsoft Online Services Sign-In Assistant for IT Professionals
- Windows Azure Active Directory Module for Windows PowerShell 32-bit version or 64-bit version
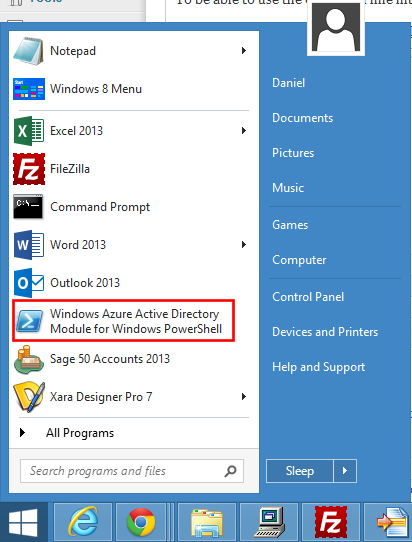
Once you have installed both of those applications, you’ll see a new icon on your Start menu called “Windows Azure Active Directory Module for Windows PowerShell”:
Logging into the Powershell system to administer Office365
- To make use of the Powershell system, first open the shortcut highlighted above by single left-clicking on it. You’ll see the following, fairly uninviting and quite intimidating, screen:

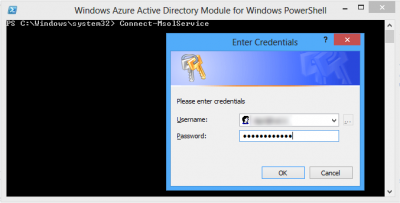
- To do anything at all, we need to log in. To do that, type Connect-MsolServiceNote:
for all of these commands, you can copy and paste them, however, even that isn’t straight forward. You can’t press CTRL+V to paste into the Powershell window – you must right click and then select Paste. If you press CTRL+V, you’ll just get a ^V symbol and that won’t do anything.Once you’ve typed Connect-MsolService, press enter and a popup window will open, asking for your Office365 administrator login name (that’ll be your main Office365 email address) and your password (the same you’d use to log into webmail for that address):
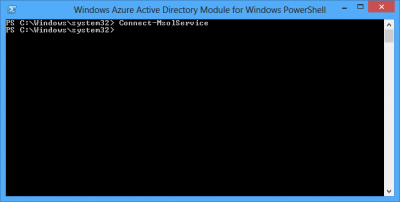
- Once you are logged in, you’ll just see a new line in the Powershell window – there’s no party or congratulations here!


Set your password never to expire
By default, Office365 forces you to change your password every 90 days. As you can’t re-use a password again either, typically people end up having a password like Purp!eButt3rfly and then each time they’re forced to change it they’ll change to Purp!eButt3rfly1, then Purp!eButt3rfly2, then Purp!eButt3rfly3 etc… writing down which is the current one.
I’m not really a fan of that: changing passwords from one secure password to another is good in an ideal world, but people don’t behave ideally.
You can’t use the Office365 admin portal to turn off the default “force new password” option, but we can do it using Powershell. Here’s how.
First you need to have installed the Powershell applications to your PC, then you need to have logged into your Office365 account, then:
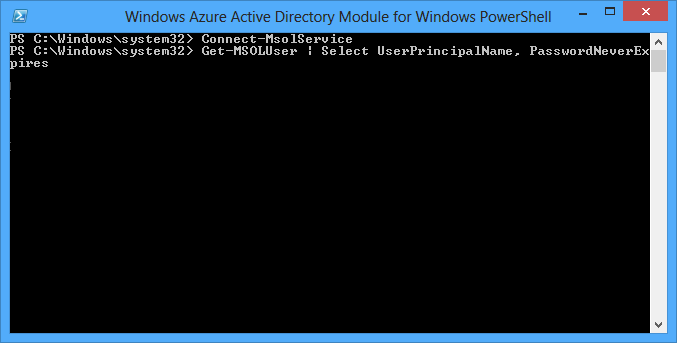
Enter the command Get-MSOLUser | Select UserPrincipalName, PasswordNeverExpires
It’ll look like this:
Press Enter, and you’ll see this:
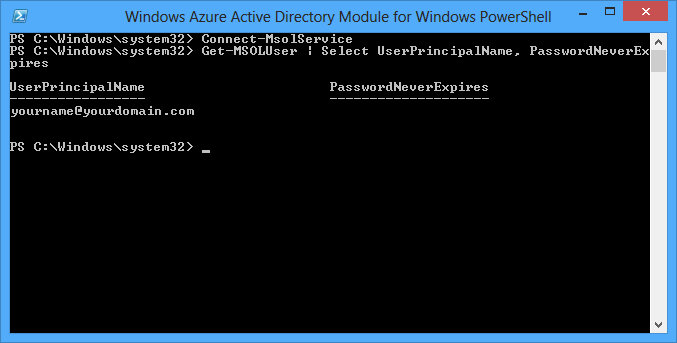
That tells us that the username yourname@yourdomain.com doesn’t have a password that never expires (otherwise it’d say True on the right hand side, under PasswordNeverExpires) – and that’s how things are by default. Every 90 days, that user will be prompted to change their password.
To turn off the 90-day password expiry, enter the command Set-MsolUser -UserPrincipalName yourname@yourdomain.com -PasswordNeverExpires $true and remember to replace yourname@yourdomain.com with your actual email address. Press Enter. You’ll see the screen below:
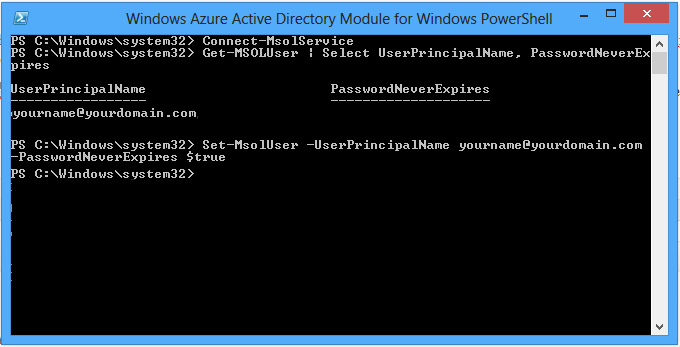
As there is no confirmation that anything changed, we can repeat the first command we gave, to check the password status.
You could retype your command, but a shortcut is to press the “up cursor key” on your keyboard – that’s the arrow pointing upwards in the block of four arrow keys on the bottom right of your keyboard. Pressing the up/down keys cycles through the previous commands you’ve entered, so if you press ‘up’ twice you’ll see the Get-MSOLUser | Select UserPrincipalName, PasswordNeverExpires command again: press Enter to run it.
This time we see this:
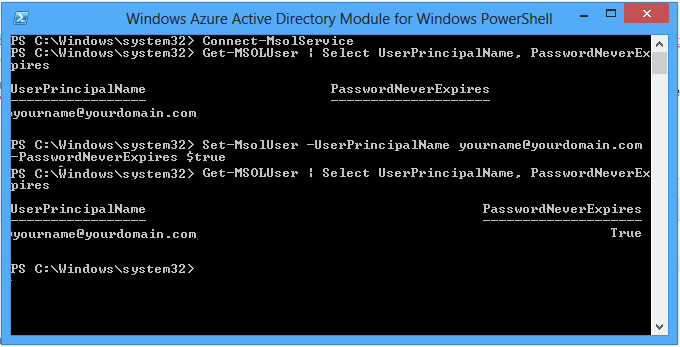
So what we’ve done is we listed the users with passwords that never expire (and saw none), then told Office365 never to expire the password for yourname@yourdomain.com, then we listed the users with passwords that never expire again – and this time we have a ‘True’ next to our address.
Our password for the Office365 account will now never expire.
For more information on this topic, see Microsoft’s online help here. They show how to reverse this change, and how to make this change to ALL users, not just the specific one we did here.