
Back to Step 5
Checking your WordPress users
You don’t want to have really common usernames on your WordPress website because it makes valid login details easier to guess. Early versions of WordPress defaulted to having a user called Admin, so this is one of the most common usernames across the whole internet: you automatically become slightly more secure if you don’t have that as a valid username.
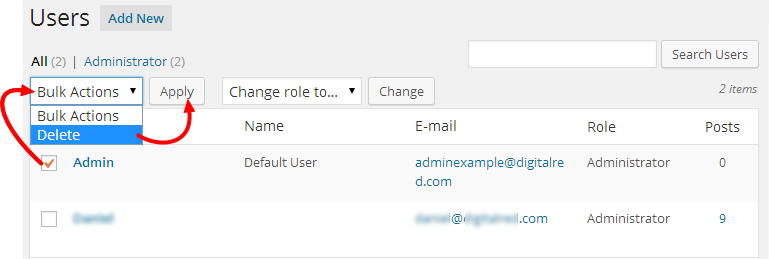
To check, you just need to go to your WordPress admin homepage and then click on Users at the bottom left of the menu. We want to do two things here: check that you don’t have a user called Admin AND to check that you expected to see all of the users that you do see.
If you do have a user called Admin, or if you have other users that you didn’t know about, select them all by putting a tick in the box to the left of each username, then click on the Bulk Actions pulldown menu and select Delete and then Apply:
(If you do have a user called Admin, you really really should delete it. If it’s the user that you’re logged in, you can’t. You need to create a new user with a different name for yourself while you’re still logged in as Admin: do that by simply clicking Add New at the top of the Users page (it’s at the top left): you need to set the new user to be an ‘administrator’ using the pulldown on the new user page, and then log out as Admin, and then log in with your new username. THEN you can delete Admin as above).
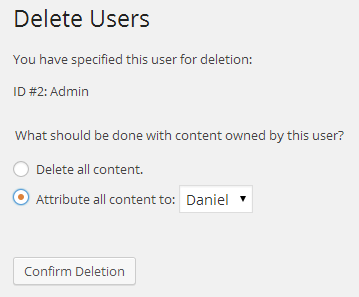
You don’t lose any Posts or Pages that belong to the user(s) that you delete, because WordPress lets you reassign the content that the deleted users had created – that’s what the next screen is asking about. Select your own user and then click Confirm delete:
Install Wordfence to further secure your website
There is an excellent security plugin called Wordfence which will email you whenever there is an update to WordPress or one of your plugins that needs to be installed. It’s really worth installing.
To install it, follow the same procedure that you used in Step 4 to install the XML-RPC plugin, but this time search for Wordfence instead. As soon as you activate it (the final step of that procedure), it holds your hand and steps you through everything you need to know on a “Tour” of its features.
Once you are familiar with Wordfence, the recommended settings for the Options page are:
Enable live traffic view – disable
Update Wordfence automatically – enable
Where to email alerts – your main email address
Alert on critical problems/warnings – enable
Lock out after how many login failures – 5
Lock out after how many forgot password attempts – 2
Count failures over what time period – 1 hour
Amount of time a user is locked out – 5 days
Don’t let WordPress reveal valid users in login errors – enable
Prevent discovery of usernames – enable
Immediately block the IP of users who try to sign in as – admin
Hide WordPress version – enable
Participate in Real Time WordPress security network – enable
Enable the Wordfence Falcon cache to speed up your website
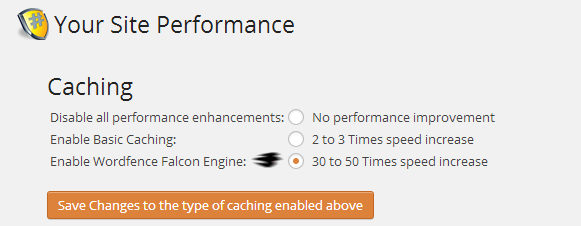
Once you have got Wordfence installed, you really ought to enable the “Wordfence Falcon Engine”, which you do in the Wordfence -> Performance Setup page. It claims to make your website something between 30 and 50 times quicker, and while it might not quite achieve that, it really does make your website a lot faster. There are lots of notes on how and why it works on Wordfence’s website so there’s no need to cover it further here.
Disable the WordPress ‘Edit’ feature
From within the WordPress dashboard, you are able to edit any file (from a theme, plugin, or your CSS files) – but this isn’t really necessary. If someone did gain access to your WordPress website, they could use the Edit feature to inject their own code into other pages on your website. When they start doing that, it’s time to restore from a week or month-old backup – it’s a really big problem.
Fortunately it’s really quite easy to disable the Edit feature.
Using the same method as you did in Step 4, you need to log into cPanel and open the File Manager, then go to the public_html folder and select wp_config.php.
As we’re about to change the file (and we just told it “don’t let anyone change the file”) we need to click the Change Permissions button and put a tick in the ‘Write’ column under ‘User’ again (so that the 400 changes to 600″). Then click the Code Editor button so that we can make our change.
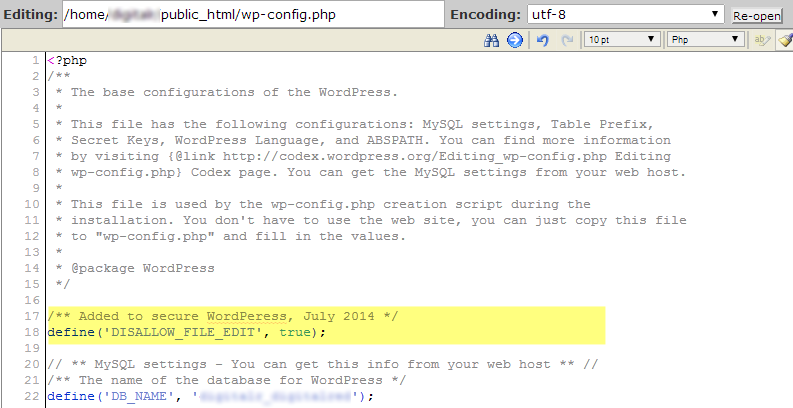
Add a couple of new blank lines just above the line
// ** MySQL settings - You can get this info from your web host ** //
Copy and paste the two lines below:
/** Added to secure WordPress, July 2014 */
define('DISALLOW_FILE_EDIT', true);
Assuming you now have a file looking like the image below, you then click Save and then Close, then in the File Manager again, click wp_config.php and Change Permissions again and untick the Write box so that the numbers at the bottom read 400 instead of 600.
Check your website with a security scanner
The Wordfence plugin can scan your website, but don’t just leave it there: you can also use the Sucuri and/or Google scanners to scan your website to make sure that it has not been compromised: try the Sucuri malware scanner and Google’s SafeBrowsing report (replace digitalred.com in the address bar with your own domain on the Google page)
Are you using secure passwords?
Come on! You know you should be. You should be using a secure password for everything, but as importantly, it should be a unique password every time. Make a new one now if you don’t already use a secure password for your user in WordPress. Generate a new password using this secure password generator now, and then go to WordPress, click Users and then My Profile and change your password before you finish today.
You’re done!
Remember to check for updates and to backup your website regularly – ideally weekly, but monthly at the very worst. If you don’t think that you can keep up to that, ask Daniel to do it for you: now you’ve got this far it’d only be £15-25 per quarter to keep your WordPress installation, plugins and themes up-to-date.