
Back to Step 3 | Skip to Step 5
Password protecting the wp-admin folder and wp-login.php file
There’s already your login details to protect WordPress, but that’s fairly soft in that someone can get a computer to sit there all day and guess away until they get the right details – if they try, they’ll get there eventually.
In this step, we’re going to get the server itself to password protect the login page: that means you’ll have TWO logins to enter before you can get into your website, but it makes things significantly more secure because if the server itself manages the login, it can monitor how many times someone tries to get in: if they try more than 10 times without success, the server just plain stops talking to them.
This protects your website because it effectively disappears to the hacker, and it protects the server because it saves resources that would be wasted on failing logins just get avoided completely: the hacker can’t see your website, so will not be able to log into it.
Defining our password protected area
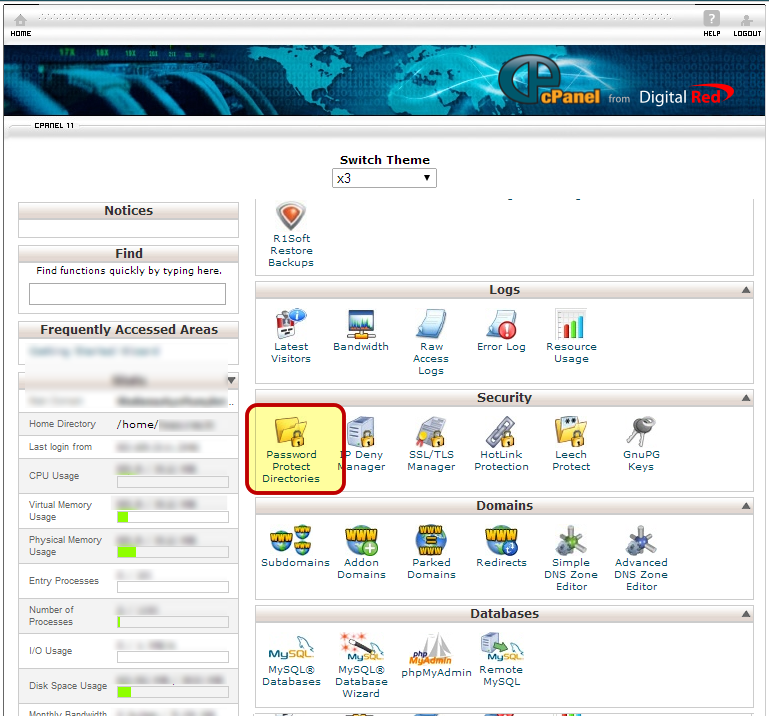
To apply this protection, we can use cPanel and it’ll do the hard work for us. So we go back to www.mysite.com/cpanel (or https://cloud.digitalred.com:2083 directly) just as we did to take the backup in Step 1, but this time we click on Password protect directories – which is in the Security box about half-way down the page:
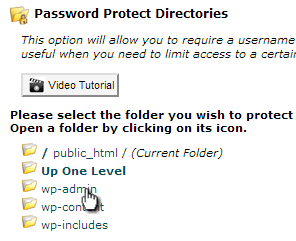
We need to tell cPanel which folder we want to protect, so we click on the wp-admin folder:
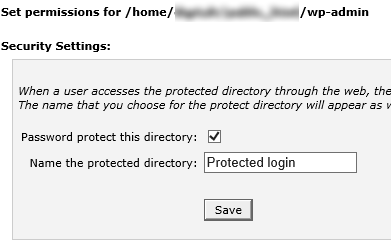
Once the next page opens, first we need to enable the password protection in the Security Settings box by making sure there is a tick in the Password protect this folder box, and then type something into the Name the protected directory. It doesn’t matter what you type in here, but it WILL be seen by anyone trying to log in (it will be shown by your web browser when you log in next time) – so something like Protected login is a sensible thing to type. Click Save before continuing:
Further down the same page, you will need to now choose a username and a password. cPanel can generate a random password for you, so enter a username (it will be case sensitive, so if you use Daniel here, you must log in as Daniel later: daniel and Daniel are considered different) and click Password generator
Make a note of your new password, and click Use password to enter it alongside your username, then press Add authorised user as in the image below:
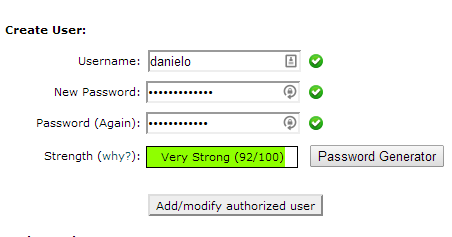
You can carry on when you see your new username appearing in the Authorised users box below. If you don’t see your new username in that box, try creating it again.
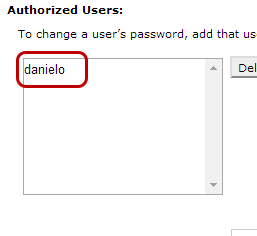
You really do want to make a note of that username and password – without it you’ll not be able to log into WordPress again!
Password protected area complete
So, from now onwards, when you go to your WordPress login page, you need to enter your new login details in the new password prompt that you’ll see before you can see the normal WordPress login page. This double login provides more than double protection, because the first level of protection is provided by the server and not just WordPress. Anyone getting that first password wrong too many times will be blocked from trying again.
Removing admin-ajax.php from the password protected area
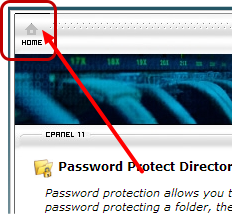
We’re not done with the passwords yet though: there is a file in the WordPress wp-admin folder which we don’t want to hide behind the new password protected area, so to do that we need to go back to cPanel. Click the Home button at the very top of the page to continue:
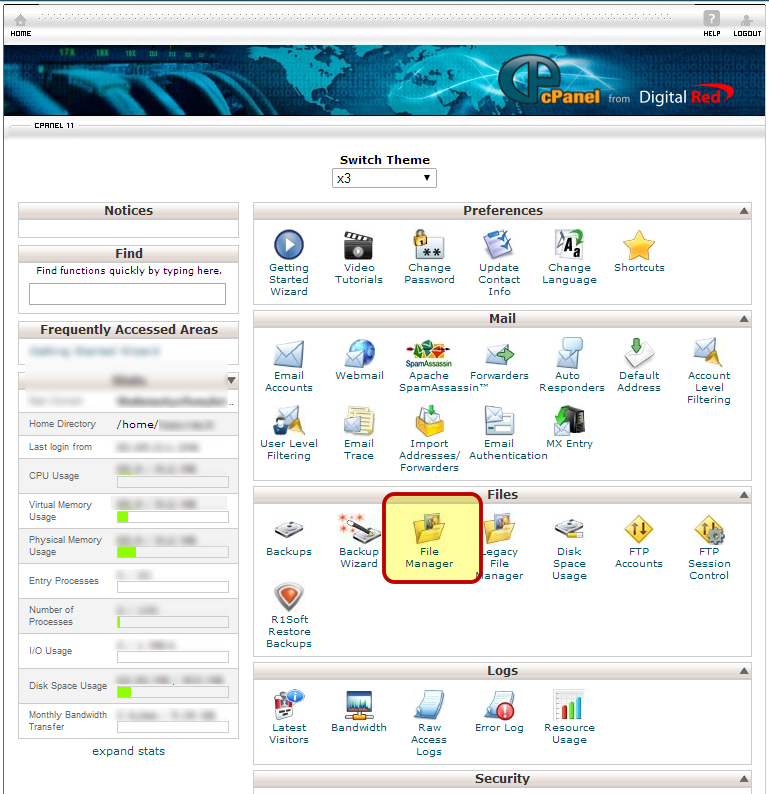
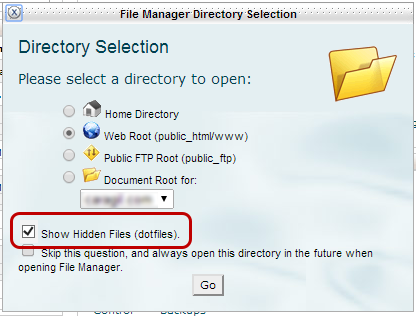
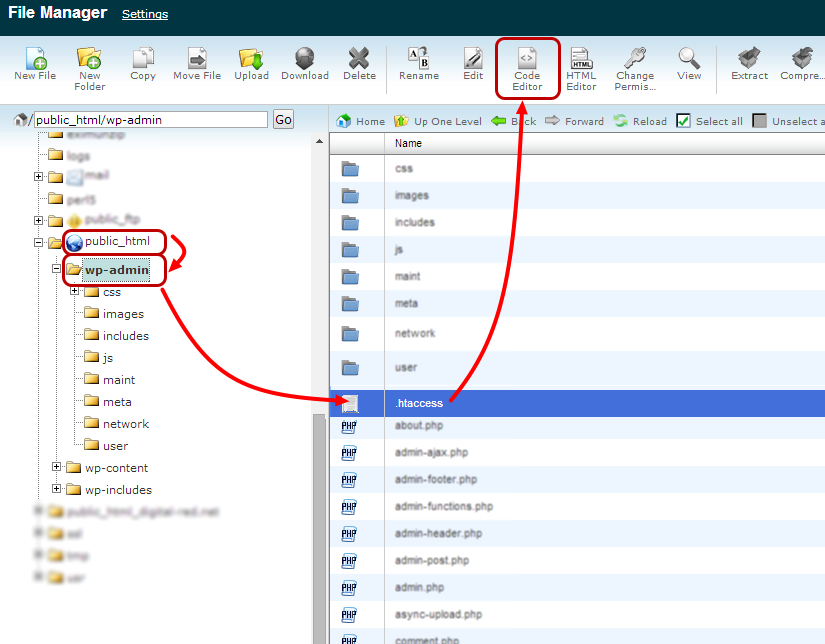
Now we’re going to click on File Manager – it will open a new tab, and once it does, you need to put a tick in the box which says Show hidden files (dot files) before you press Go:
Once you see the File Manager window (it can take a few seconds to open), click on public_html on the left so that the folders display, and then click on wp_admin so that you see the list of files on the right. Click on .htaccess on the right and then click the Code Editor button at the top of the window: click on the screenshot below for a clearer idea of what you’re doing…
Once the Code Editor window opens, you need to click at the start of the first line (it says AuthType Basic) and add a couple of empty lines in. Then, copy the text below, and paste it into the space you’ve just made:
ErrorDocument 401 "Denied"
ErrorDocument 403 "Denied"

# Allow plugin access to admin-ajax.php around password protection
<Files admin-ajax.php>
Order allow,deny
Allow from all
Satisfy any
</Files>
Click the thumbnail below to see what you should have had before and after – your newly pasted text (the bit in yellow) should be above the original text (the bit in green) – provided you’ve got that right, you can click Save changes at the top right – but don’t click Close yet…
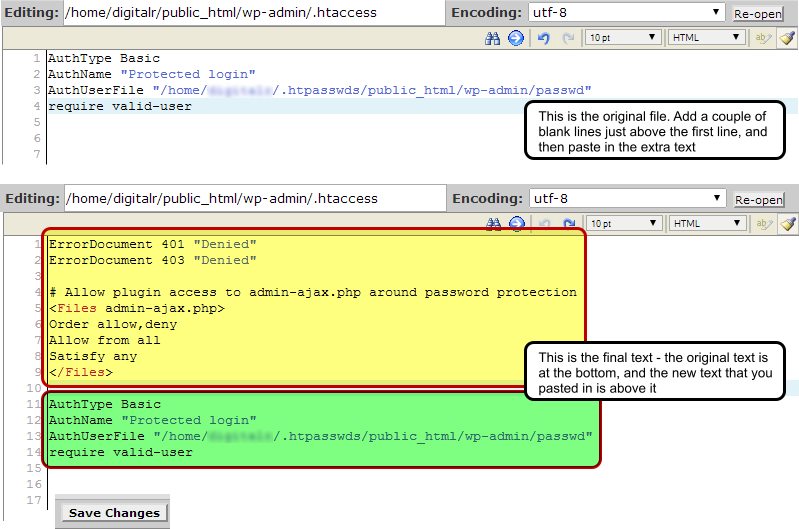
Before closing the Code Editor window, you need to copy the original text that is now at the bottom of the page. In the screenshot above, it’s the bit in green: copy it from your Code Editor window, and then press Close.
Protecting the wp-login.php page
So we have just edited the file called .htaccess in the public_html/wp-admin folder (to password protect the wp-admin folder except the admin-ajax.php file), but now we need to edit the same file in the public_html folder (to password protect the wp-login.php file). Don’t worry if that doesn’t make sense, just keep doing what you’re told…
In the File Manager window, click on public_html on the left, and then click on the .htaccess file and click Code Editor (that’s not the one in the wp-admin folder that we did earlier).
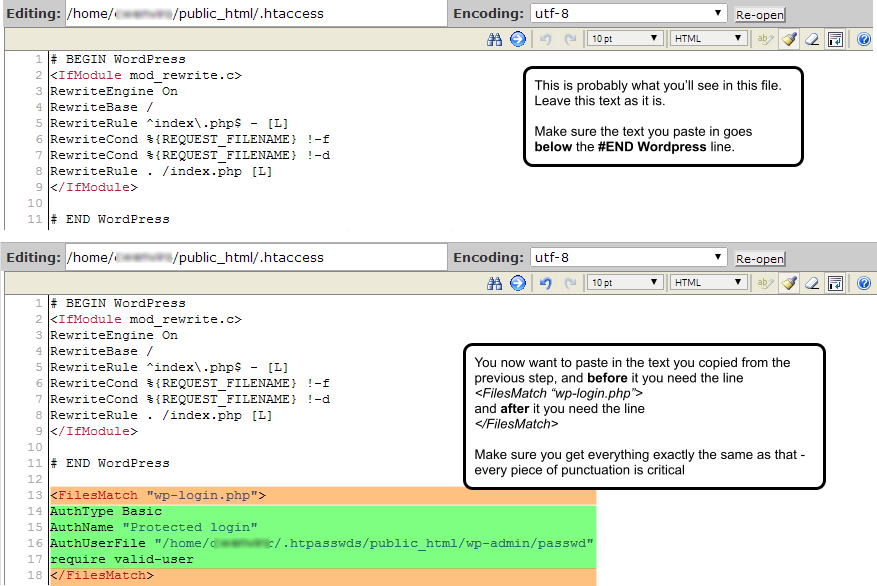
Once that file is open, we need to paste the text you copied from the previous step (the bit that was highlighted in green in the previous screenshot – you needed to copy it from your site because it’s unique to you) after the # END WordPress line in this file. Once you have done that, before the block of text you’ve pasted you want to enter
<FilesMatch wp-login.php>
and then after your pasted in text, you need to enter the line
</FilesMatch>
Your file should now look like this screenshot (click to enlarge):
Don’t save or close that file yet though – keep reading…
Pasting in the bulk of the blocking code to restrict brute force attempts:
We’re nearly there now. There’s just one huge chunk to copy and paste from here. Copy all of the code below and paste it after your new </FilesMatch> line…
# PASTED IN JULY 2014 WORDPRESS SECURING - START
#  Avoid redirect loop by defining error message for error 401/403
ErrorDocument 401 "Denied"
ErrorDocument 403 "Denied"

# enable symbolic links
Options +FollowSymLinks

# Deny Access to No Referrer Requests
#  Stops spam attack logins and comments
#  Oi! Remember to change mysite.com to your domain name!
<IfModule mod_rewrite.c>
RewriteEngine On
RewriteCond %{REQUEST_METHOD} POST
RewriteCond %{REQUEST_URI} .(wp-comments-post|wp-login)\.php*
RewriteCond %{HTTP_REFERER} !.*mysite.com.* [OR]
RewriteCond %{HTTP_USER_AGENT} ^$
RewriteRule .* - [F,L]
</ifModule>

# Deny Access to Multiple File Types
#  To restrict access to sensitive file types
<FilesMatch "\.(htaccess|ini|log)$">
Order allow,deny
deny from all
</FilesMatch>

# Block access to wp-config.php file specifically
#  Also remember to CHMOD the wp-config.php file to 400
<files wp-config.php>
order allow,deny
deny from all
</files>

# Deny directory browsing
Options All -Indexes
# Block Amazon cloud
RewriteBase /
RewriteCond %{HTTP_REFERER} ^http://.*amazonaws\.com [NC,OR]
RewriteCond %{REMOTE_HOST} ^.*\.amazonaws\.com$ [NC,OR]

# Block the include-only files.
<IfModule mod_rewrite.c>
RewriteEngine On
RewriteBase /
RewriteRule ^wp-admin/includes/ - [F,L]
RewriteRule !^wp-includes/ - [S=3]
RewriteRule ^wp-includes/[^/]+\.php$ - [F,L]
RewriteRule ^wp-includes/js/tinymce/langs/.+\.php - [F,L]
RewriteRule ^wp-includes/theme-compat/ - [F,L]
</IfModule>

# PASTED IN JULY 2014 WORDPRESS SECURING - END
Just before you save all of that, look about a third the way down and see the bit where it says mysite.com (coloured red above, but it’ll be black in your Code Editor window) – you absolutely must change that to be your domain name (ie example.co.uk or digitalred.com). You must also leave the . after the domain name too, so that you really do replace mysite.com with your own domain (no www.) and make no other changes.
Did you change mysite.com to show your domain name after pasting that code?
Make sure that you didn’t leave mysite.com in that block of code, and then click Save Changes in the Code Editor window, and then Close.
Locking down wp-config.php
That takes you back to the File Manager where we make our final “difficult” change: find the file wp-config.php and click on it to highlight it, then press Change Permissions at the top.
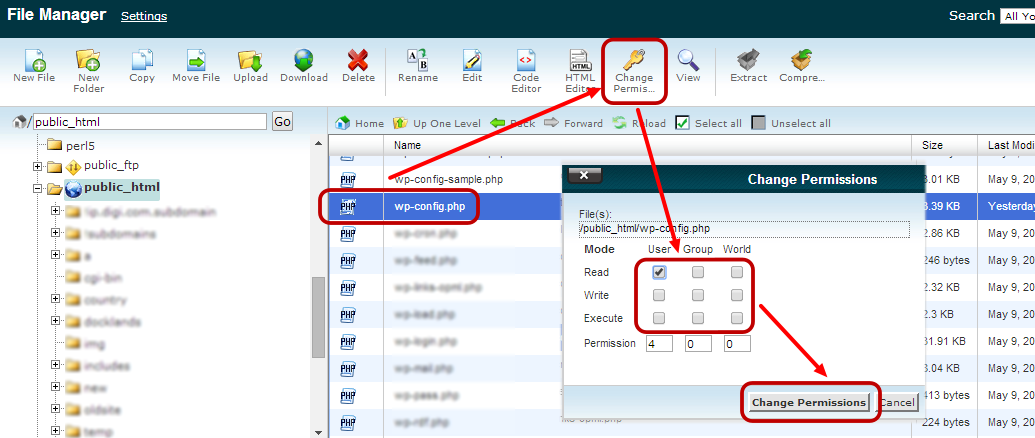
In the window that pops up, untick everything except the top left box, so you’re left with the numbers 400 along the bottom. Click Change Permissions.
You can close the File Manager window now.